
ANALOG TIMER PROGRAMMING
If you have purchased a feeder package without a timer, you may use any other timer than listed here or in the feeder's manual. For a home automation system, you may plug the feeder's power adapter into any 120V module that you can turn a light or appliance with. The feeder can also be directly powered and controlled by any automation system with a voltage output of 12 to 24 volts ac or dc. If you can control the feed time duration with the automation system in second increments, you may set the feeder to its maximum run duration and control the feed cycle time and portion size entirely with your alternate system. All timers supplied by Super-Feed are NOT manufactured by Super-Feed.
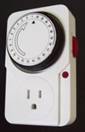
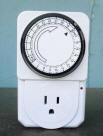
24-hour format analog timers ACAT-23 (Mfr. #TU-22A far left and TG-16 center/right)
First, make sure all the black pins are pulled up towards you. Then, all you need to do is push one (1) black pin inward opposite each time of day you want to feed. Then manually rotate and set the clock dial to correct time facing the black arrow/pointer on the dial. If it ever loses time or you need to slightly adjust feed time more accurately, simply rotate the dial a few clicks clockwise very slowly.
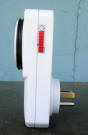
The small red lever on the front right side of the dial MUST BE pushed in the down position as shown for automatic "on-off" mode (no red light on). In the up position (I), it is in override (continuously ON-red light on), meaning that you can "manually" turn on your feeder in that position until the feed cycle is complete for extra manually initiated feed cycles (feeder must have been off for at least one to two minutes prior to doing that for it to trigger again), then return it to automatic mode (clock icon position) by pushing the red lever back down. When the timer is on, you will see a red light on the timer and a blue or green power light in the feeder (your feeder may have a green light when the motor runs and a blue power light). Although the feeder will feed for whatever amount of time you pre-adjusted it to run when it first receives power, the blue or green power light (early models) on the feeder will stay on 15 minutes for each pin you pushed. Only one needed per feed cycle desired. The feeder will spend most of its lifetime in the "off" mode (no power light inside) and will only run for the time you pre-adjusted the feeder’s internal controller when it is initially powered and triggered by the timer. Basically, you operate the timer as if you were turning a lamp on at programmed times. Instructions can also be found on the back of the blue card inside the timer’s blister pack or face of the dial.
After you have pre-adjusted the feeder portion size as per your manual and programmed the timer, simply plug the feeder’s power adapter into the timer. Your Super Feeder will now be triggered at programmed times. There should not be any lights remaining on in the feeder. If you do, you do not have the timer set correctly for automatic mode.
Once again, there should not be any lights remaining on in the feeder. If you do, you do not have the timer set correctly for automatic mode.
If you ever suspect that something is wrong with the timer, just make sure the dial turns clockwise as time lapses. If it does not, there could be something wrong with the timer. You should be able to hear a buzzing sound while plugged in to confirm operation. PLEASE NOTE THAT IF YOU ARE HAVING A PROBLEM WITH A TIMER SUPPLIED BY US, YOU DO NOT HAVE TO ONLY USE THAT TIMER. ANY OTHER TIMER AVAILABLE LOCALLY CAN BE USED TO OPERATE YOUR SUPER FEEDER. NOTE: MOST ANALOG (MECHANICAL TIMERS) MAY EMIT AN AUDIBLE BUZZING SOUND WHICH IS NORMAL. IF YOU DO NOT LIKE THAT, AN ELECTRONIC DIGITAL TIMER IS VERY ACCURATE, LONGER LASTING AND RECOMMENDED.
Remember: Feeder must be off (no lights illuminated inside feeder) for at least 1-2 minutes between feed cycles before it can be triggered again automatically when power is once again applied to it. Feeder video: http://www.super-feeder.com/video/htm
|back to quick installation page|
ACDT-36 (Woods brand dual outlet timer) programming info
ACDT-20 (ETU-63A manufacturer's number) Digital Timer Programming