
CHUTE COVER, ROLLER AND/OR SCRAPER WIRE INSTALLATION
With the chute cover installed, make sure the food you are using is not too large and drops freely without hanging at the outlet. Do not use very large food! We guarantee the feeder to work properly with recommended kibbles as disclosed in our warranty policy. This guarantee does not cover other undisclosed types of food.
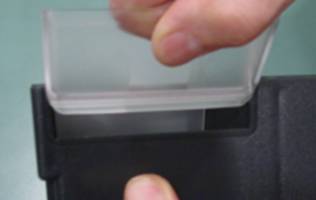
For chute cover installation (this information is mostly for the early model feeder housing): Remove bottom floor by removing 6 small screws. Remove small shaker wire (it flexes) from underneath distribution slide. Move slide out of the way. Slip chute cover into chute opening by slipping slotted edges of chute cover into window frame of chute opening, pushing evenly from side to side very carefully until it stops. Move slide back into place next to roller. Re-install shaker wire underneath slide so it lays flat on the slide bottom by slipping looped end into small hole in center bulkhead first and flexing it to slip other end into small hole located inside outer housing wall. Re-install bottom floor while holding housing upside-down, and re-install 6 small retaining screws. Do not over-tighten. When done, test-run the feeder to make sure slide shakes. Recommendation when mounting feeder to your own mount: For best protection, install the feeder so the chute cover is resting directly or very close to the top of the bowl you are using or high enough so your pet cannot stand up and reach up into the chute opening. You may use a guttering system or enclose the feeder, which is the best protection, particularly outdoors, against many animals like raccoons, squirrels, rats, etc…The chute cover is not raccoon proof and could be broken off by wild animals. If a chute cover is installed and you would like to remove it, follow instructions above. Chute cover DOES NOT snap in or out, it must be slipped out of opening without the feeder floor installed. If you do not do that, you may break the housing and/or chute cover!
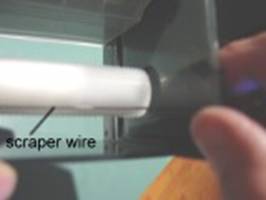
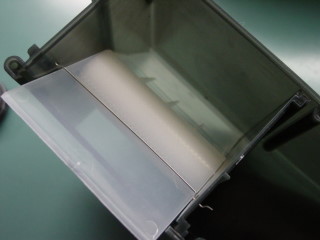
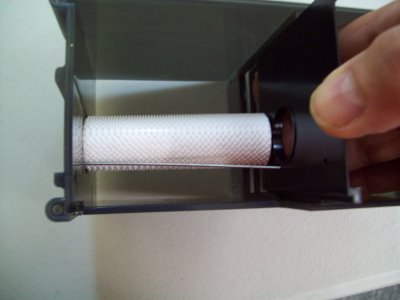
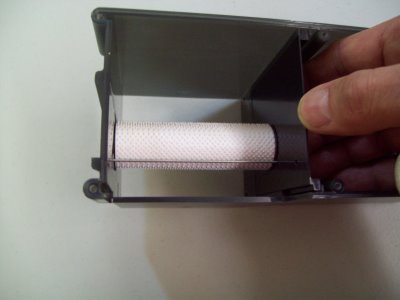
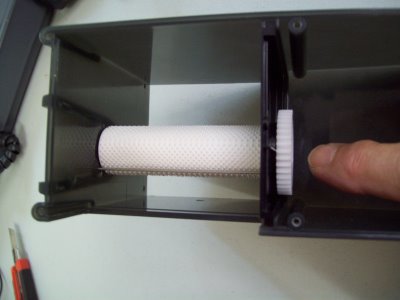
For scraper wire and roller installation (refer to 4 pictures at bottom of page): Remove bottom floor by removing 6 small screws. Remove large white plastic gear from inside roller. Lift up center bulkhead about a half inch or entirely as shown. Slip one end of scraper wire into small hole located inside the outer wall of housing. While flexing other end next to center bulkhead, slip it into small hole in center bulkhead. Push bulkhead down in place and push on side of bulkhead to make sure scraper wire is firmly in place. Re-install large plastic gear into roller by slowly spinning and pushing on gear until all the way in. Move slide back into place next to roller. Re-install shaker wire underneath slide by slipping looped end into small hole in center bulkhead first and flexing it to slip other end into small hole located inside outer housing wall. Re-install bottom floor while holding housing upside-down and install 6 small retaining screws—do not over-tighten.
For roller replacement installation, you will follow the same procedure as the scraper wire installation because the scraper wire may also come loose, although you do not need to remove it.
For slide replacement, remove shaker wire by slipping it out through the center bulkhead, then pop out the slide by bending it at the upper rib side. It will snap right out, then snap the new one in an replace the shaker wire in reverse order and position wire as show in picture below before re-installing the feeder floor. The gate also very simply snaps in or out for replacement by bending the upper rib.
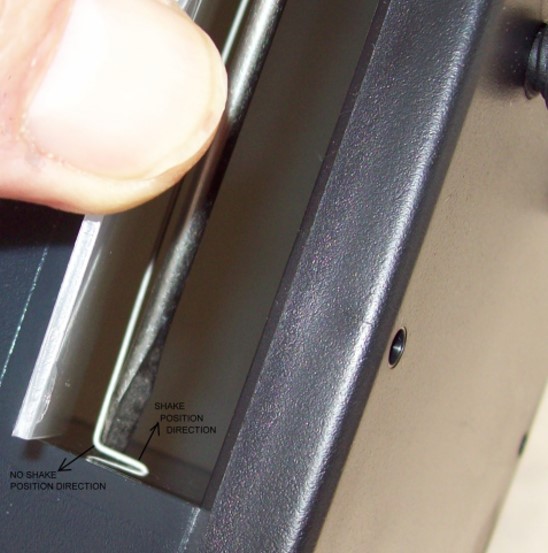
Disabling/enabling shaker wire shown at left with feeder bottom installed and proper position of shaker wire shown at right before re-installing bottom if removed from feeder
ROLLER-SCRAPER WIRE REPLACEMENT STEPS BELOW

DETAILED YOUTUBE VIDEO FOR COMPLETE FEEDER DISASSEMBLY AND ASSEMBLY