
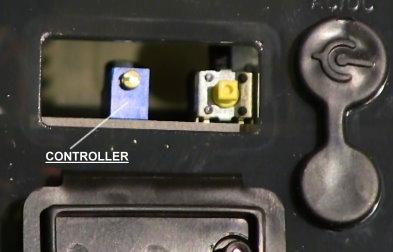
Supplemental information update: The "feed time adjustment" dial will differ in some later models. If your feeder does not have a dial as shown above left, it will have a "multiple-turn" (about 20) micro adjustment type slotted screw that you can turn around and around for very fine adjustment of feed cycle time as depicted in far right picture above. Also, it will not have a "jumper" plug meaning that the reset time is standard at 1-2 minutes of off time. That model's status power-on light (showing under the translucent housing to the left of the feed time adjustment dial) will be blue instead of green in earlier models and will stay on as long as the feeder receives power. Additionally, there will also be an internal green light that will only be on while feeding and will go out after the motor stops. The green light helps troubleshooting for possible motor failure.
TECHNICAL INFORMATION ABOUT THE SUPER FEEDER OPERATION
The feed adjustment controls the length of time the feeder will run from a split second to approximately 70 seconds after power is initially applied to the jack or the terminal strip underneath the feeder. Typically, 60 seconds of time will dispense about 1 cup of cat food. The smaller the food, the more food will be dispensed for a given time. Power is normally applied to the feeder through its supplied low voltage power adapter, which can be plugged into just about any type of programmable timer such as a common lamp timer, digital lamp or appliance timer, power module with a home automation system (see http://www.smarthome.com ), a clapper switch, a remote control device, etc... You may control your Super Feeder from anywhere with our Wi-Fi Smart Socket It can also be directly powered by any type of timing device that has a 9 to 24 volt AC or DC output, such as a "Malibu" light timer/transformer (12Vac), a sprinkler timer with 24Vac output, or any other programmable timing device of your own. If wanting to only feed a specific group of days and skip days, you will need a 7 day (weekly) digital timer.
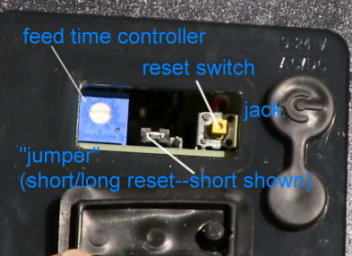
All current feeders only need 1-2 minutes of off time to reset the electronics and do not have a "jumper" plug.
A reset jumper in very early model feeders may be set for a standard reset "off" time of approximately 30-60 minutes with a shiny prong visible to the left of the plug. In some other early model feeders, this reset time was already set to a shorter 1 to 2 minutes of off time (shiny prong showing to the right) to allow multiple feed cycles within a shorter time. This is the required time that the feeder must be off between feed cycles to reset its internal feed timer. If the little jumper is set to the standard reset position, you can pull it out and switch it one notch over to the left using a pair of tweezers or fine needle-nose pliers (make sure not to drop it inside the unit), and you can then reset the feeder's internal timer with only 1 to 2 minutes of "off" time, meaning that you could feed twice within as little as three minutes using a digital timer with 1 minute available increments. The standard "off" reset time was useful primarily if keeping the remote timer on for a long time so that the feeder would not repeatedly trigger and feed several times during a storm (example) due to power interruptions. The feeder will spend most of its time in the off mode (green light out in early models and blue in current feeders), unless you leave the timer turned on in the manual mode, which you should not do unless you want to manually trigger additional feed cycles by pushing the feeder's reset switch. NOTE! YOU DO NOT NEED TO RESET ANYTHING ON THE FEEDER DURING POWER INTERRUPTIONS/OUTAGES! NORMAL FEED CYCLES WILL RESUME WHEN POWER IS RESTORED. YOU SHOULD PROGRAM SEVERAL DAILY FEED CYCLES. IF USING AN ANALOG TIMER, FEED TIME MAY BE OFF SCHEDULE DURING A POWER OUTAGE, BUT FEED CYCLES WILL RESUME WHEN POWER IS RESTORED. IF USING A DIGITAL TIMER, BATTERY BACKUP WILL KEEP EXACT TIME AND FEED PROGRAMS, AND FEED CYCLES WILL RESUME WHEN POWER IS RESTORED. WE HAVE A BATTERY SYSTEM, BUT WE HAVE FOUND REGULAR POWER TO BE MORE DEPENDABLE AND LESS PRONE TO FAILURE THAN USING BATTERIES.
The reset switch basically serves two functions: It can void the reset "off" time required between cycles while the power is off to test the remote timer with multiple cycles in a row, and to adjust the amount of food dispensed by repeatedly pushing the reset button and adjusting the feed dial until you get the amount of food you want dispensed per cycle. You normally do this before you install your feeder and while you have the supplied power adapter plugged into a 120 volt socket and the feeder is connected to the low voltage power adapter.
The status power-on light is mounted internally for waterproofing. It illuminates through the acrylic plastic housing to lets you know when the feeder is receiving power and also serves as a power status/testing device. IT SHOULD NOT BE ON UNLESS THE EXTERNAL TIMER IS ON MANUALLY OR AUTOMATICALLY! This light should be off most of the time.
A picture above "volume" adjustment screw which controls the aperture (opening) between the flexible gate and the roller for the size/type food you are going to use. It should be adjusted so the gap between the roller and the gate is about the longest measurement of the food you are going to use, so it does not continue to drop through freely. Note that some will drop through when first filling but should stop. Once adjusted, you MUST use the electronic controller shaft/dial to control the feed cycle time for desired portion size. DO NOT use the volume screw to do that!
Please keep in mind that portion accuracy is directly dependent on the size and type of food used. Generally, the smaller and more uniformly shaped the food is, like pellets, the more accurate the portions will be. The feeder has been tested many times with recommended kibble type as disclosed online using 1/4" spherical type kibbles. With recommended kibbles, the feeder is guaranteed to produce portion accuracy within 0.1 to 0.2 oz. Many different other types of kibbles will work just fine up to even 1/2" diameter if portion accuracy is not of utmost importance. Oddly shaped kibbles which do not stack closely together well in the feeder will of course not produce portion accuracy as well as spherical ones. If portion accuracy must be exact, you should use a feeder with pre-filled compartments.
SUITABLE POWER SUPPLIES: The jack fits just about any type of 2.1 mm plug with center positive if using a DC power pack, or the polarity does not matter if using an AC power pack. Of course each feeder is supplied with its own power pack for you to use, or you could use your own. You may use any power adapter/transformer with a voltage output from 12 to 24 VDC or AC with power output of 200 mA or more. The supplied plug for the feeder jack is 5.5 mm x 2.1 mm with center positive (+) if using a power adapter with dc output. If you don't have one with the correct size plug, you may simply use bare wires attached to the alternate input terminal strip underneath the feeder, which can be used instead of the side input jack. The bottom of the feeder has a "+" symbol opposite the terminal screw that has to be positive if using a power adapter with DC output.
The rubber plugs assure weatherproofing, particularly for outdoors use. Be sure to check plugs periodically to make sure animals have not pulled them out allowing water (outdoors) to get inside unit, which could cause the feeder to run to whole time the external timer is on. For outside cat feeding use, we strongly recommend enclosing the feeder for protection from wild animals or at the very least covering the chute opening with a guttering/downspout system or other means.

Triggering several feeders simultaneously
The terminal strip does the same thing as the jack and plug, except that you can use wire directly hooked to it. It can be used for a "bare" wire input hook-up for the KSF-2 Koi-Pond model or the CSF-3 cat feeder to keep animals from unplugging the jack plug if necessary. You can also use it as an input/output to wire multiple feeders together and trigger them simultaneously. A cord is available to do that. Attach the second feeder's adapter cord metal blades to the first feeder's terminals underneath the feeder (picture above), and plug the plug end of the cord into the second feeder's input jack. Another option if you want to separate the feeders farther away from each other is to use a long wire like speaker wire. You then attach one end to feeder number one's alternate terminal strip underneath its floor and attach the other end to feeder number two's alternate terminal strip. You could then trigger two feeders using only one timer and power adapter. Note: When using this technique, observe polarity of the terminal strip (+) if your power supply is DC output. If you hook it wrong and the feeder does not run, simply reverse wires on the terminals. You could use a power strip plugged into one timer with several power adapters plugged into the strip to trigger several feeders together, or you could use a timer with dual outlets for two feeders. A wire clamp is supplied underneath the feeder to also help hold wires in place. You should use this clamp to keep the jack plug wire out of the way.
To disable the distribution slide shaking mechanism, lift the slide, slip a thin screwdriver or other item behind the shaker wire as shown, and lift up towards you as indicated on the picture below. We do not recommend disengaging the shaker with food larger than 1/4" thick by 3/8" long, but you may test other kibble sizes.

|back to quick installation page|
FOR A DETAILED VIDEO SHOWING SET-UP/OPERATION INSTRUCTIONS, PLEASE CLICK ON THE FOLLOWING LINK:
http://www.super-feeder.com/video.html
Revised 09-14-2016